
For years it has already been possible to send emails from your personal Domain from your gmail account. However, with the DKIM and DMARC it is a bit more complicated nowadays to send your emails fully authenticated. Let's take a look.
First, of course, you need a domain and webhoster/provider. At your providers admin page you can usually change the DNS records for your domain, which is necessary for this tutorial to work properly. I will show you this tutorial on the admin page of Hetzner because this (professional) webhoster offers DKIM signatures.
If your provider however does not offer DKIM signatures, you still can use Hetzner without transferring the domain. A simple and cheap webhosting account there will be enough, unless you start sending massmail.
SPF, DKIM and DMARC
Let us specify these terms before we continue.
SPF stands for Sender Framework Policy. It is simply a nameserver entry which specifies what IP addresses can send emails on the behalf of your domain.
DKIM stands for DomainKeys Identified Mail and adds a signature to your email using a private and a public key. The public key will be published as an DNS entry on your host to check its validity. It is important to understand that the signature will be added from your mail software on the server instead of your E-Mail programm.
DMARC stands for Domain-based Message Authentication, Reporting and Conformance. Basically this additional DNS entry tells the receiving email server, how to handle incoming emails based on SPF and DKIM.
Set up Gmail to send from your Domain
You could of course buy a G Suite plan which fully uses the Google servers to receive and send emails. However, beside the costs, there are some disadvantages. You may receive updates to your Google services in different speeds and you may also be blocked from using some other Google services because they are not designed for businesses.
With the free version of Gmail you can use your domain too, however it involves a somewhat different setup process.
Settings at your provider
- If required, register a new domain or transfer or import (Hetzner: “I want an account; the domain will remain with the previous provider.”) your domain to your provider. This is needed in order to make the provider aware of your top level domain name and to handle it within your account.
- Next, create a new mailbox, for example
smtprelay@yourdomain.tld. The name really doesn't matter, it's only for SMTP login credentials. Remember your password. - Now create a forwarder for the email address, which you actually want to use (e.g.
you@yourdomain.tld). Let the forwarder point to your Gmail address (you@gmail.com). - Next create the DNS entries. Please note that you have to use the server which actually handles your DNS requests. If you use Hetzner only for your SMTP needs, you have to enter your DNS records at your main provider which actually handles DNS:
- SFP @ (or TXT if SFP is not available):
v=spf1 a mx ip4:IP_OF_YOUR_MAILSERVER -all - TXT _dmarc.yourdomain.tld:
v=DMARC1;p=quarantine;sp=reject;pct=100;adkim=r;aspf=r; - TXT default2008._domainkey.yourdomain.tld:
v=DKIM1; p=MIIBIjANBgkqhkiG9w0BAQEFAAOCAQ8AMIIBCgKCAQEAur247/M1/v08Zz0D6nW4/9UypWhWJ5XLbOs/tAjF3q8/PrSmcPts……………….64witxqUe5Pxyfw48g1yzev5n0SOOPi0WP8snoKVlFZOo+COXotCTltjvgHoVJZb3GZa6B+/ZO3r9XzYsMwKEyLCnTbzhLdR1VHRl3UuYwicsfhSURkwoSQIDAQAB
Please use your own public key, as this is only an example. Check your providers FAQ on how to generate the public key. (On Hetzner you simply go to your KonsoleH › E-Mail › DKIM / SFP / DMARC and activate DKIM.) You might also have to split up the key. If you do not have to split up the key you will have to remove the separator spaces (i.e. “ “) Hetzner automatically includes.
You may also use an SFP generator if you use more than one SMTP server (e.g. your scripts sending through your providers SMTP).
Also the DMARC entry is relatively strict. It does not allow emails from subdomains and it also tells the receiving server to check 100% of the emails (which eventually should always be the case, lower values use can be used for transitioning).
Settings at GMail
Next head over to Gmail. Under Settings › Accounts and import, you know can click at Add an order email address. Enter your name and the email address you entered in your forwarder previously. Make sure that Treat as an alias is checked. Click next and enter your SMTP connection values. For Hetzner these look like this:
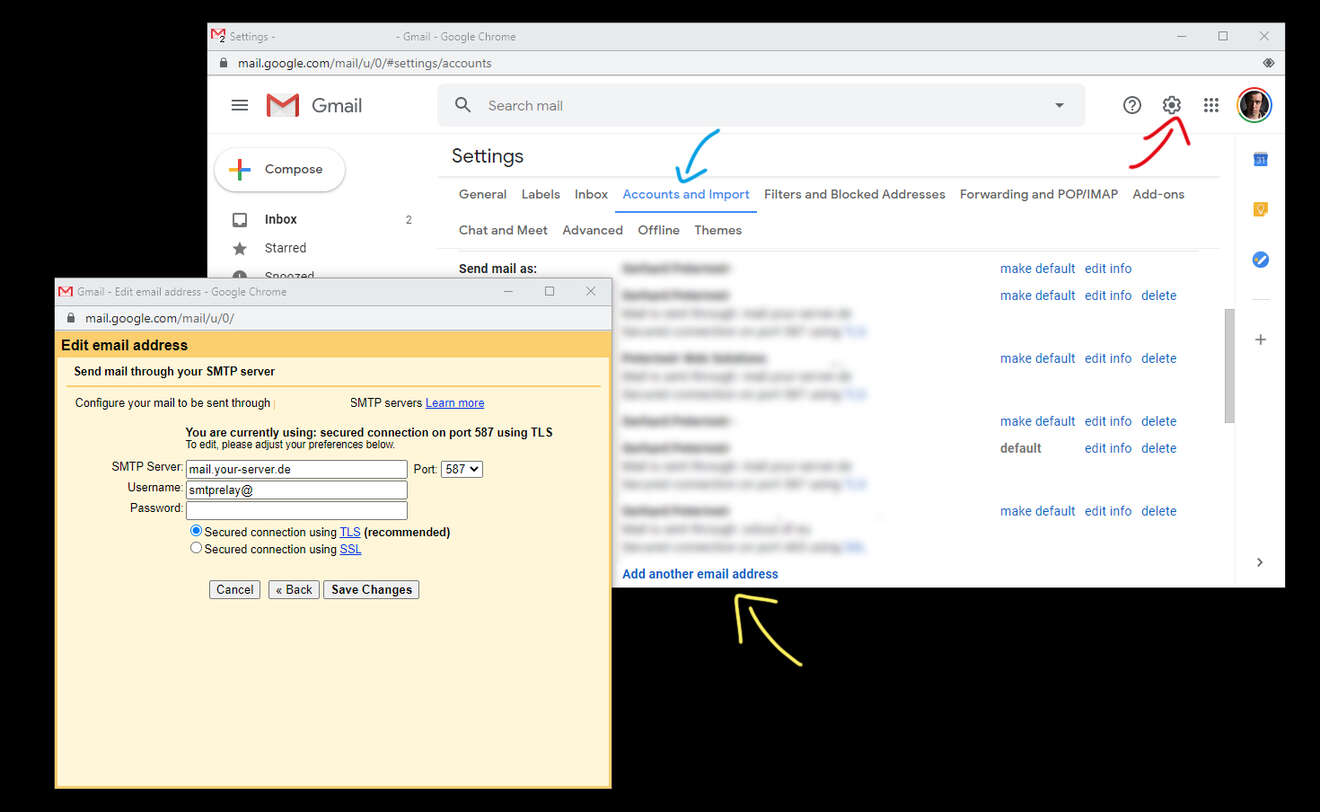
- SMTP Server:
mail.your-server.de(literally “your-server.de”, do not replace this with your domain name!) - Port:
587 - Username:
smtprelay@yourdomain.tld(Not the forwarding email address!) - Password: Your Password
- Secured connection using TLS (recommended)
You now have to verify your email address with a pin code that gets sent to your email address. The email should already be successfully forwarded to your Gmail account. Simply enter this PIN code and you're good.
Finally check your email score. There is a great service to do this and it's called Mail tester. With the settings above, you should score somewhat near 10/10, with the differences only depending on the contents of your message. It may also take a while for your DNS settings to populate the World Wide Web.
Debugging
There are a few tools on the internet to help you debug or optimize your configurations, simply search for example SFP generator, DKIM checker, … you get it. Mail tester should also give you great tints with what is wrong with your email settings. If your email doesn't even arrive at Mail tester you may want to check the mail logs off your server. For example, if you received the following error you might have forgotten to add a forwarder: sender verify fail for <you@yourdomain.tld>: Unrouteable address.
Enjoy!